Violin Bow Introduction
If you are learning violin, your violin bow matters just as much as your instrument. Many beginners focus only on the violin itself, but the bow plays a huge role in your sound, control, and overall technique.
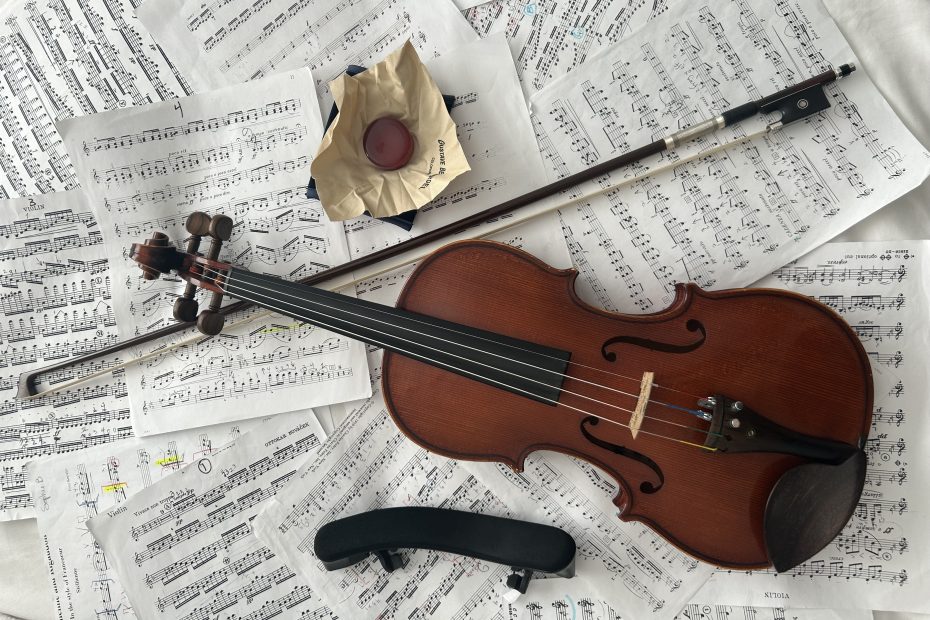
A violin bow is what creates sound by pulling across the strings and making them vibrate. Without proper bow use, even a beautiful violin can sound rough or uneven. That is why understanding your violin bow is one of the most important parts of becoming a better player.
From the materials it is made of to the way you hold it, every part of the bow affects how you play. Learning the correct violin bow hold can feel awkward at first, but it builds the foundation for strong technique and better tone.
In this guide, we will break down everything you need to know about the violin bow, including:
- The main parts of a violin bow
- What violin bows are made of
- How to create a proper violin bow hold
- Common mistakes to avoid
- How your bow affects your sound
- Tips for improving bow control and technique
Whether you are brand new to violin or trying to fix bad habits, this guide will help you understand why your bow matters more than you think.
Already feel like you know enough? Skip to “How to Play Violin” to learn more.
What Is a Violin Bow and What Does It Do?
A violin bow is the tool used to create sound on the violin by pulling across the strings. The bow causes the strings to vibrate, which creates the sound you hear.
This is different from plucking the strings with your fingers, which is called pizzicato. Bowing creates a smoother, longer, and more controlled sound. It also gives you more options for expression, dynamics, and tone.
Think of it this way: your left hand chooses the notes, but your right hand controls how those notes sound.
That means your bow controls things like:
- Volume
- Tone quality
- Smoothness
- Articulation
- Musical expression
This is why bow technique matters so much. A strong violin bow hold and good bow control help your playing sound more polished, even if you are still learning basic notes.
Parts of a Violin Bow (Full Breakdown)
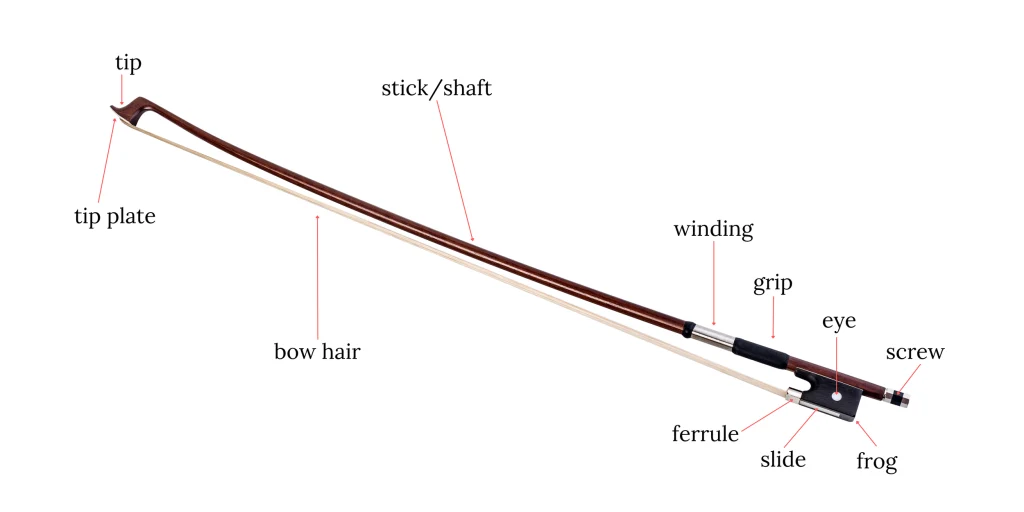
Before you can improve your bow technique, you need to understand the parts of the violin bow and what each one does.
Even though a bow looks simple, every part has a purpose.
Need a refresher about parts of a violin? Read “Parts of a Violin: Your Violin Anatomy Breakdown”
The Stick
The stick is the main body of the bow. It runs from the frog to the tip and gives the bow its shape and structure. Most violin bows have a slight inward curve called the camber. This curve helps create balance, flexibility, and bounce.
The stick helps with:
- Bow control
- Weight distribution
- Flexibility
- Response on the strings
A well-balanced stick makes playing feel smoother and easier.
The Bow Hair
The bow hair is the flat white section stretched along the stick. This is the part that touches the strings. Most traditional violin bow hair is made from horsehair. It may seem surprising, but horsehair works well because of its natural texture and strength.
The bow hair grips the string and creates vibration when you move the bow. However, bow hair does not work well on its own. It needs rosin. Rosin is a sticky material rubbed onto the hair to create friction. Without rosin, the bow will slide across the strings without producing a strong sound.
This is one of the most common beginner mistakes in violin bow application—either using too little rosin or too much.
The Frog
The frog is the lower part of the bow where your hand holds it. It connects the bow hair to the stick and helps control the tension of the hair. This is also where proper violin bow hold begins. Your fingers should sit around the frog in a relaxed and balanced position.
The frog is small, but it plays a huge role in comfort and technique.
The Screw
At the end of the frog, you will find the screw. The screw tightens or loosens the bow hair. Turning it changes the tension. Before playing, you tighten the bow enough so the hair has space from the stick. After playing, you should always loosen it again.
Leaving the bow tight all the time can damage the stick and affect the shape over time.
The Tip
The tip is the opposite end of the bow from the frog. It helps with balance and allows for control at the upper part of the bow. Playing near the tip can feel harder for beginners because you have less direct control there. As your technique improves, you will learn how to use the full length of the bow with confidence.
Understanding the tip helps you use your entire bow instead of only playing in the middle. This is an example of a skill you will learn as you begin learning violin. For more tips on beginning lessons, check out the post “What to expect at your first violin lesson?”
What Are Violin Bows Made Of?
Not all violin bows are made the same. The materials used affect the sound, feel, durability, and price of the bow. Knowing the difference can help you make better choices as a beginner.
Pernambuco Wood
Pernambuco is one of the most respected woods used for high-quality violin bows, known as a “golden standard” in a lot of cases.
It is strong, flexible, and responsive, which makes it ideal for advanced playing. Musicians often prefer pernambuco bows because of the control and sound quality they provide.
Horsehair
As mentioned earlier, traditional bow hair is made from horsehair.
This material creates the right amount of grip on the strings when combined with rosin. It also responds well to different playing styles.
Over time, bow hair wears out and needs to be replaced through a process called rehairing.
Carbon Fiber
Carbon fiber bows are very popular for students and beginners. They are often lighter than traditional wood bows as well.
They are:
- Durable
- Affordable
- Resistant to weather changes
- Consistent in quality
Many teachers recommend carbon fiber bows because they are reliable, lighter to put less strain on the player, and easier to maintain than wood bows.
Synthetic Options
Some bows use synthetic hair or other modern materials. These can be useful for certain players, but traditional horsehair is still the most common choice.
Why Materials Matter
The material of your violin bow affects:
- Sound Quality– Better materials often produce a smoother, clearer sound.
- Durability– Carbon fiber bows are harder to damage and handle travel well.
- Price– Wood bows can range from affordable to extremely expensive. Carbon fiber often gives beginners strong value for the price.
As a general rule, beginners should focus on comfort, reliability, and control rather than expensive upgrades.
How to Hold a Violin Bow (Beginner Guide)
Learning the correct violin bow hold is one of the hardest parts of early violin playing. At first, it feels unnatural. Your fingers may feel stiff, awkward, or unsure of where to go. That is normal. The goal is not to grip the bow tightly. The goal is balance and flexibility.
Basic Bow Hold Position
Your hand should look relaxed and curved, not flat or tense.
A good violin bow hold includes:
- A bent thumb
- Curved fingers
- A relaxed wrist
- Light pressure, not squeezing
Think of holding the bow like holding a small bird—you want enough control to keep it safe, but not so much pressure that you crush it.
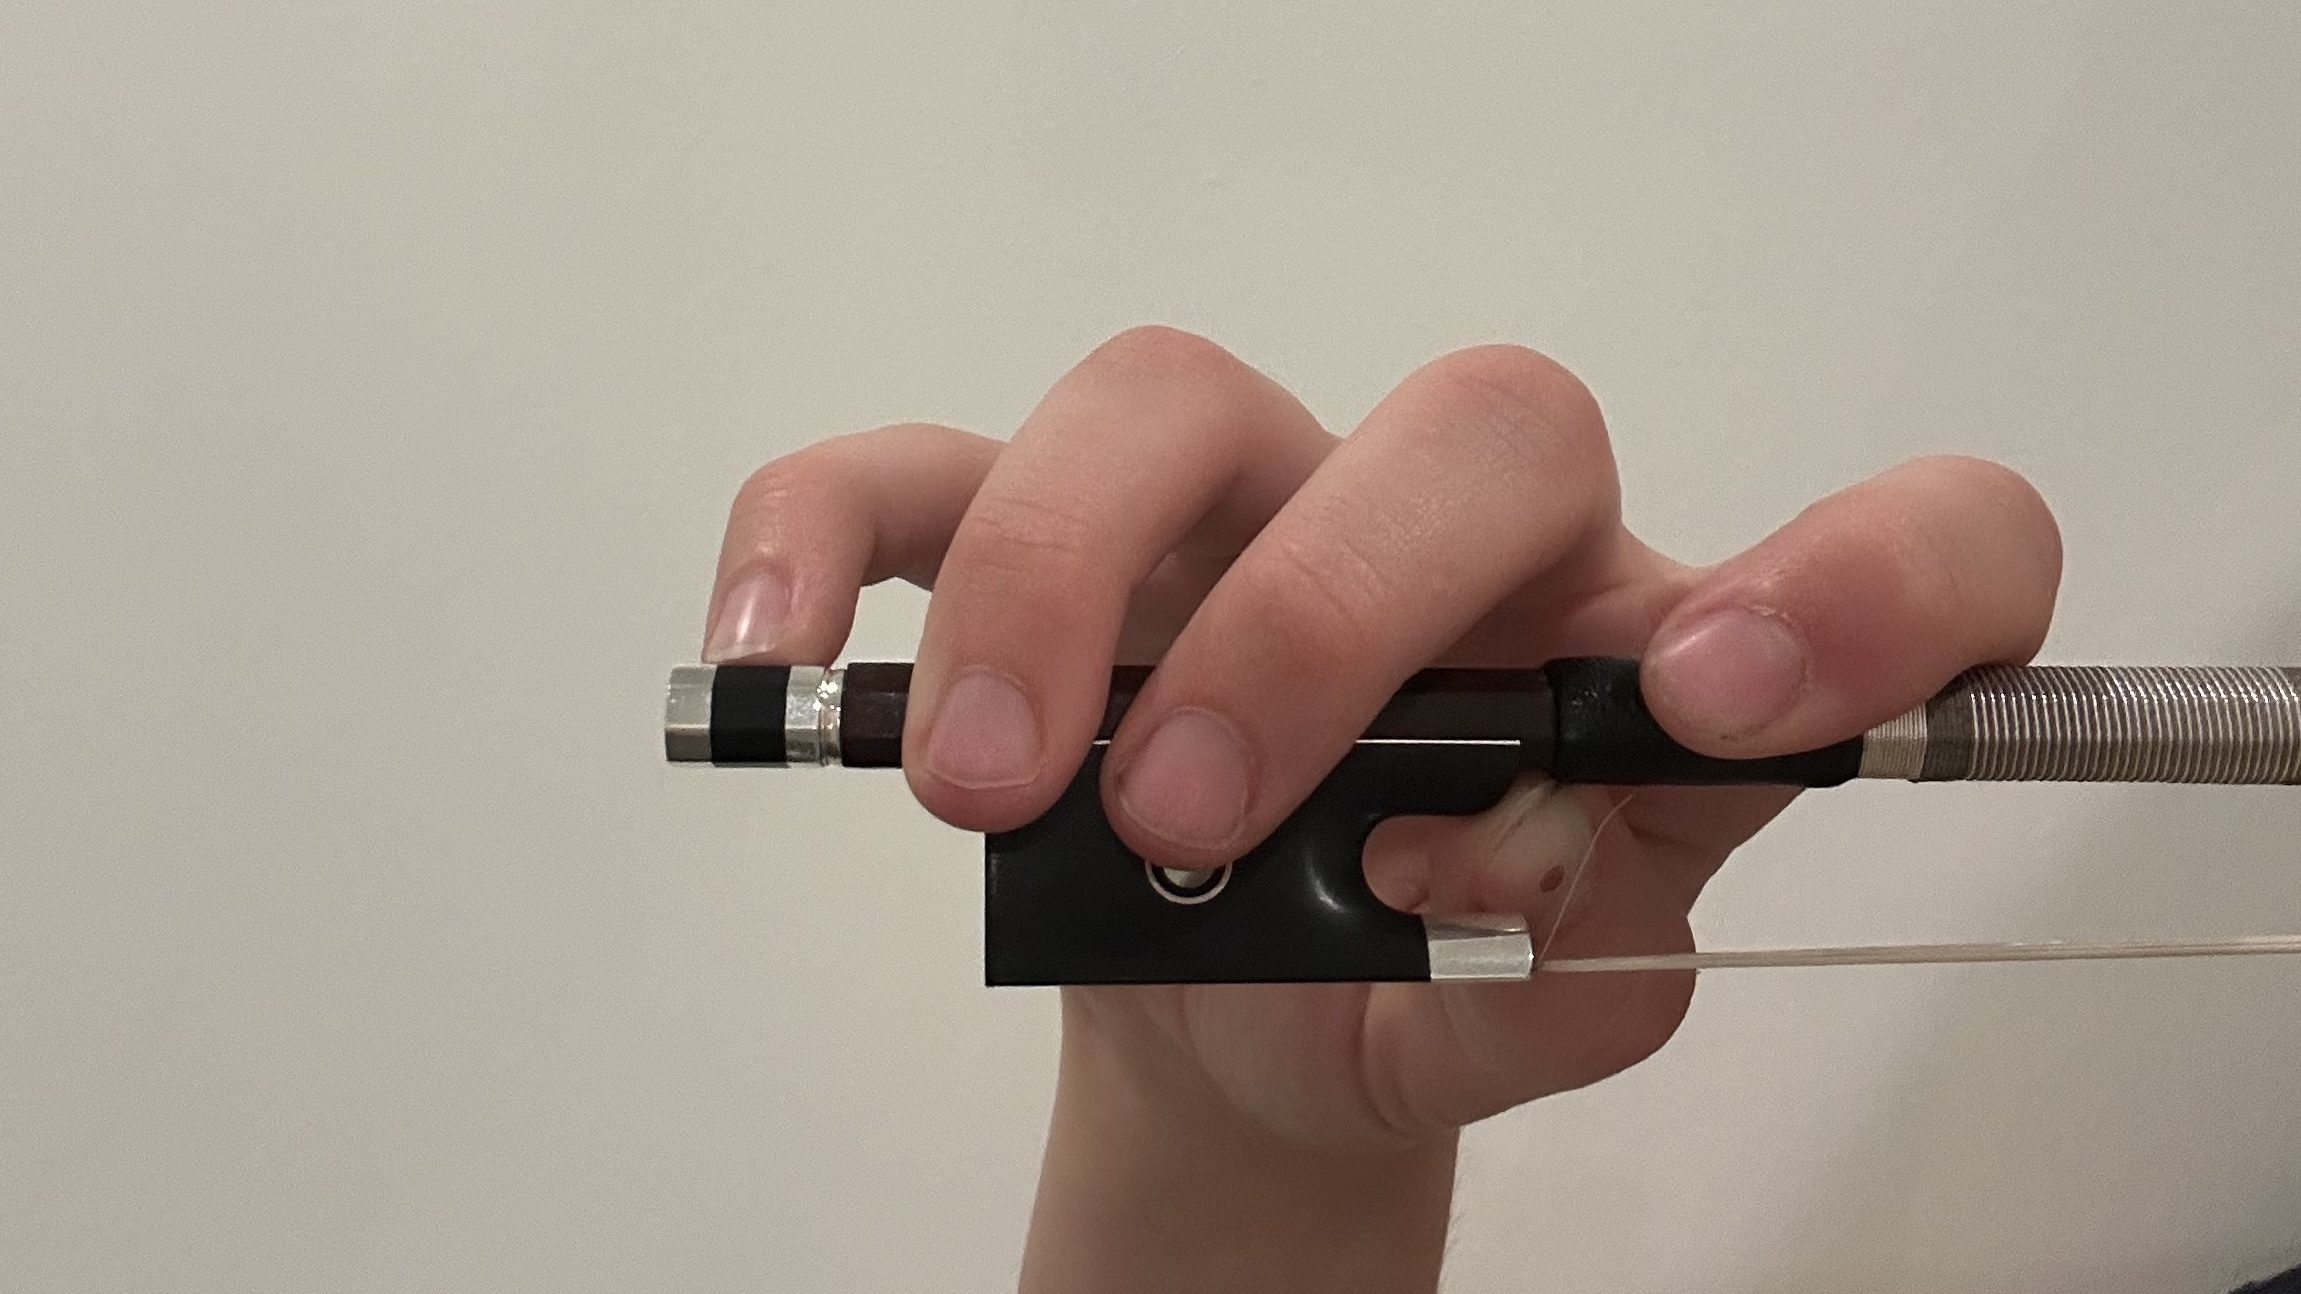
Here is an example of what a bow hold should look similar to. Reference this as we go into each individual finger placement below.
Thumb
Each finger has a specific job in the bow hold. Your thumb should bend and rest underneath the frog, near the grip area. It should never lock straight. A bent thumb helps absorb movement and keeps your hand flexible. It should also not be going through the space between the stick and bow hair. Visualize it as “you don’t want to stick your head (your head being your thumb) into the lions cage (the cage being through the gap).
Pinky
Your pinky sits bent on top of the bow near the screw. It helps with balance and control, especially at the frog. Many beginners struggle with this finger because it feels weak. That is normal. It gets stronger with practice.
Index Finger
Your index finger helps guide pressure and control the bow. It sits the highest, usually just barely touching the winding. You don’t want it wrapped too far around the bow, unlike your middle fingers. It should rest naturally on the stick, not press too hard. Too much pressure here often creates a harsh sound.
Middle Fingers
Your middle and ring fingers wrap around the frog area and provide support and stability. These two fingers are what you put farther down than your pinky or index finger as seen in the picture above. They can help keep the hand balanced and relaxed.
What It Should Feel Like
Your bow hold should feel:
- Flexible
- Balanced
- Relaxed
- Light, not tight
It should not feel like a death grip. If your hand feels tense after a few minutes, something needs adjusting.
For a visual breakdown, check out my violin bow chart here for finger placement examples and step-by-step guidance.
Common Bow Hold Mistakes to Avoid
Most beginners make the same few mistakes. Fixing these early makes a huge difference. As you learn, using a pencil instead of a bow to practice your hold can be a great segway into the real thing if you are having a hard time. Here are some common bow hold mistakes to avoid.
Gripping Too Tight
This is the biggest problem. When you squeeze the bow, your hand becomes stiff. That stiffness travels to your wrist, arm, and sound. A tight grip creates tension and makes smooth bowing much harder.
Not fixing a tight bow hold can also lead to issues in the future such as tendonitis.
Straight Thumb
A straight thumb locks your hand and limits flexibility. Keep the thumb bent and soft. This small change improves control immediately.
Flat Fingers
Flat fingers reduce flexibility and balance. Your fingers should stay naturally curved. Think relaxed, not rigid.
Tension in the Wrist
A stiff wrist makes your playing look and sound forced. It can also lead to tendonitis in the future. Your wrist should move naturally with the bow. Using a mirror during practice helps you catch this quickly.
How the Bow Affects Your Sound
Your bow is responsible for much of your tone quality. Even if your left hand is correct, poor bow use can make the sound rough or weak. Three things matter most:
1. Pressure
Too much pressure creates a harsh, scratchy sound. Too little pressure creates a thin, weak sound. The goal is balanced contact.
2. Speed
Bow speed affects both volume and tone. Faster bow speed often creates a bigger sound. Slower speed creates a softer sound. Learning how speed and pressure work together is a major part of good violin technique.
3. Placement on the Strings
Where your bow touches the string matters. Playing too close to the bridge can sound harsh. Playing too close to the fingerboard can sound unclear. Most beginners should aim for the middle lane between those two areas. This helps create a clean, focused tone.
Tips to Improve Your Bow Technique
Improving bow control takes time, but small habits make a huge difference.
Practice Slowly
Do not rush. Use a pencil at first and then practice with a bow. Slow practice helps your hand build correct muscle memory. Fast practice with bad form only builds bad habits faster.
Use a Mirror
A mirror helps you see things you cannot feel.
Check:
- Bow straightness
- Wrist tension
- Finger shape
- Shoulder relaxation
This simple tool improves technique faster than most students expect.
Focus on Relaxation
Tension is the enemy of good bowing. Take small breaks and reset your hand often. Relaxed technique always creates better sound.
Build Muscle Memory
A good bow hold feels strange at first because it is new. Repetition makes it natural. Short, focused practice sessions work better than long frustrated ones.
Choosing the Right Violin Bow
Many beginners ask if they need an expensive bow to sound better. Usually, the answer is no. It is true that a better quality bow can lead to better sound, but the best beginner bow is one that feels comfortable, balanced, and reliable for the player.
If wondering about violins, read about violin pricing in the post “How much does a violin cost?”
Beginner vs Advanced Bows
Student bows focus on durability and consistency. Advanced bows focus more on subtle control and tone quality. As a beginner, consistency matters more.
Budget Considerations
A good beginner bow does not need to be expensive. Many students do well with a quality carbon fiber bow because it offers strong value and durability. Avoid choosing only based on appearance. A pretty bow does not mean it plays well.
When to Upgrade
You may want to upgrade when:
- Your technique improves
- Your teacher recommends it
- Your current bow feels limiting
- You are ready for better response and tone
Do not rush this step. Strong technique matters more than expensive equipment.
Taking Care of Your Violin Bow
Good care helps your bow last longer and perform better.
When to Apply Rosin
Most players apply rosin every few practice sessions, depending on use. Too much rosin creates dust and scratchiness. Too little creates a weak sound. You want just enough grip for a clean tone. You should reapply every 4-6 hours of practice time.
Looking for a practice routine? Read “5 Practice Habits Every Violinist Should Know.”
Loosen After Playing
Always loosen your bow after practice. This protects the stick and helps maintain the proper curve. It takes five seconds and saves long-term damage.
Avoid Touching the Bow Hair
The oils from your fingers can damage the hair and reduce grip. Try to handle the bow only by the frog and stick. This small habit keeps the hair working better for longer.
Final Thoughts: Why Your Bow Matters More Than You Think
Your violin bow is not just an accessory. It is one of the most important parts of your playing. It creates your sound, shapes your tone, and controls your expression. Learning the parts of the violin bow, understanding what it is made of, and building a strong violin bow hold will improve your playing more than most beginners expect.
Do not worry if your bow hold feels awkward at first. Every violinist starts there. Focus on relaxed technique, slow practice, and strong habits. Small improvements in bow control create big results over time.
If you want extra help with finger placement and proper setup, check out my violin bow chart for a simple visual guide that makes bow hold much easier to understand.